A while ago, I wrote a piece on on Domain-Specific Languages in Theia.
Things have changed a bit in the meantime, and as the original post still has a lot of reads, I decided to deliver an updated version.
The main change is that Eclipse Theia’s compatibility to VS Code has become so stable that the support for the Language Server Protocol (LSP) in Theia extensions has been dropped to reduce maintenance.
Instead you have to wrap your language server in a VS Code extensions now.
This will run smoothly in Theia as well, and thereby in all the cool new cloud-based tools based on it, like Gitpod.
As a positive side-effect, your DSL becomes usable for the wide audience of VS Code users, too.
The backside is that VS Code extensions are a bit more tedious to implement.
But let’s start from the beginning.
Domain-specific languages
Domain-specific languages (DSLs) allow to formally capture your knowledge about a certain domain and transform it directly into executable code.
A DSL is a very powerful tool that lets you define abstractions even across technological boundaries.
Frameworks like Xtext help you to implement your own textual DSLs including a smart editor, a validator, a code generator, and a lot of additional sugar with little effort.
Still DSLs are kind of heavy, so please consider them the last resort for solving your abstraction problems.
This article shows how to build a VS Code language extension for your DSL.
We will use:
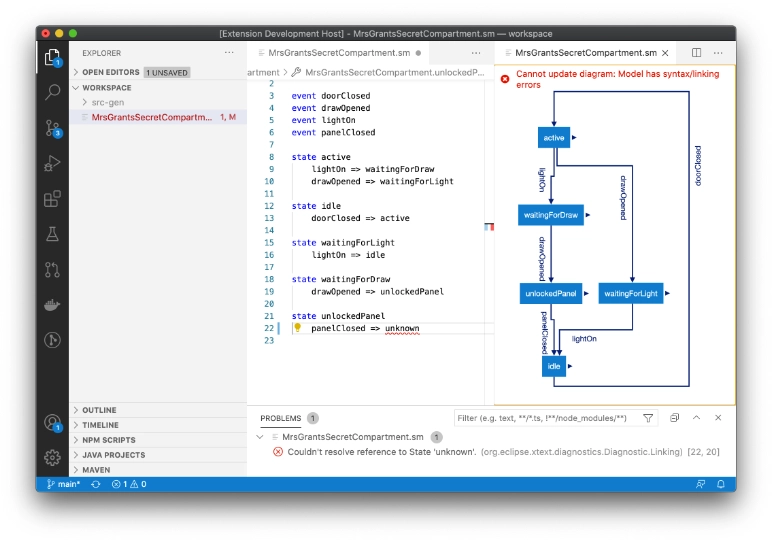
The example we use is a very simple DSL for statemachines. The following screenshot shows an hopefully self-explaining example in the final workbench:
You can find the code on GitHub.
The repo contains the individual steps in consecutive branches. I’ve added links to open these branches in Gitpod, such that you can read the code and try it out in the same workspace right in your browser.
The last stage of the code will be maintained in the sprotty-vscode repo.
Stage 1: A simple VS Code language extension
To scaffold a new VS Code language extension, use the yeoman code-generator and choose a New Language Support as extension.
In the resulting code skeleton, you may want to tweak the language-configuration.json to configure editor behavior like Toggle Block Comment or bracket matching to your language.
Also adapt the TextMate grammar states.tmLanguague.json to set up syntax highlighting appropriately.
If you’re using VS Code, you can then hit F5. This will start a new runtime VS Code with your extension installed.
Open a file ending in the file extension for your DSL and see syntax highlighing, bracket matching and automatic bracket closing in action.
Also try things F1 > Toggle Line Comment or select some text and hit ".
Alternatively, just browse and try stage 1 online in Gitpod.
So far, we’ve used only declarative configuration. Let’s prepare everything for adding actual code.
Stage 2: Hooking into the extension’s lifecycle
VS Code extensions are activated on demand only. We specify our extension to be activated when the first states file is opened by the user by adding an activationEvent in the package.json.
We also insert an entry for the main JavaScript module, that implements the functions activate and deactivate to hook into the (de-)activation.
That module is implemented in TypeScript which requires additional setup.
If you now open the first *.sm file in the runtime VS Code, you should see message in the lower-right corner of the IDE that the plug-in has been activated.
Stage 3: Add a language server with Xtext
We are now using Xtext to create a language server for our DSL.
In Xtext, you capture the syntax, the structure of the AST, and the cross-references of the language in an enhanced grammar notation.
From that, the framework generates a lot of stuff, including a parser, a linker, smart editing support, stubs for services like code-generation and validation, and, in this case, a language server (LS) that allows to plug in all of that into various IDEs, and in particular VS Code
We create a new Xtext project (in Eclipse or using the CLI tooling) with LSP support and write a grammar for our language.
We feed that grammar into Xtext’s code generator and… get a working LS already!
You can customize almost everything in Xtext. In this case, we add a parser test, change the linking to only look at elements in the same file, implement a code generator to transform a statemachine model into a Java class, and add a few model constraints to be checked by the validator.
The resulting language server (start scripts and jars) has to be copied into the extension.
A bit of glue code is necessary in the activate to function create a new LanguageClient, start the language server and connect the two.
The resulting IDE is already pretty cool (open stage 3 in Gitpod): You can edit statemachine files with syntax highlighting, validation of syntax, linking, and constraint errors, content assist, navigation, automatic incremental code generation, etc.
As we’re in VS Code, we can version our textual DSL files with Git, or integrate the generated code in a bigger Java application using other existing extensions.
Now, let’s make it even better and add graphics.
Stage 4: Adding a diagram view
Statemachines are a lot about the connections (transitions) between the elements (states), and thereby a natural fit for graphs.
With Eclipse Sprotty, we can extend the LS to also provide a graphical model of the statemachines and display that in a diagram widget in the UI.
This way, we keep the LSP’s separation of the generic frontend and the language-aware backend.
For UI components beyond trees or text editors, VS code requires you to use a webview.
A webview lives in its own IFrame in the DOM of the VS Code application, and thus it runs even “more sandboxed” than the extension itself. It can only exchange JSON objects with the host extension.
Our Sprotty diagram client will run in a webview.
The core of a Sprotty application is a dependency injection container configuration.
In that, you define custom services, mappings from Sprotty’s graph model elements (SModel elements) to the shape renders (Views), and behavioral features of the latter.
As a refinement, we add arrow heads and fine-tune the visual appearance beyond the capabilities of CSS.
With sprotty-xtext we add diagram support to the language server.
This is mostly about changing some base classes, adding custom launcher, and implementing a diagram generator, that transforms a statemachine model into an SModel.
We use the ELK framework to place the nodes and route the edges in a nice way.
By Sprotty’s defaults, the diagram is automatically updated on changes in the associated text.
To add even more coupling, we synchronize the selections in the editor and the diagram by adding trace information to the graphical model. Finally we show errors from the text as marker bubbles in the diagram.
To wire everything up, we use the sprotty-vscode framework. It provides the necessary code to
- start language servers, also in debug mode,
- manage webviews from the extension,
- connect the language server to the extension and the extension to the webviews and tunnel Sprotty Actions through LSP and the Webview protocol.
Take it for a spin (open stage 4 in Gitpod). To open the statemachine diagram, choose Open in diagram from the context menu of the editor. Don’t miss the smooth animations that Sprotty automatically uses to morph the diagram to a new state.
The diagram is still read only. Let’s see what we can do.
Stage 5: Text-first diagram editing
Once you see the nice graphics you may ask yourself why you cannot edit the model in the graphical notation.
Or, as you have the textual editor already, in both notations at the same time, whatever fits best.
Implementing such combined editing is hard. Really hard.
A textual editor takes the text as the source of truth and derives a model from it.
A diagram editor usually goes the other way around. There is a lot of friction caused by different handling of (syntax) errors, of element identities, of transactions etc.
This will result in all kinds of problems ranging from small usability glitches to complete data loss.
The best chance to manage editing text and graphics consistently is to choose the same leading model for both editors. Given its big advantages in terms of versioning, editing speed, and fixing a broken model we choose the text.
Our approach is to map all user editing actions to text modifications, and, if possible, leverage LSP operations.
The diagram is always updated from changes of the text, never the other way around.
So for our last stage, we use further functionality of sprotty-vscode to add a popup palette that uses LSP’s code actions to create new states and events and a facility to delete elements.
We enable Sprotty’s edge editing features, and allow to rename transition labels via LSP code assist and state names via LSP rename.
Try it yourself (run the final version in Gitpod): The palette to create new elements appears when you hover over the diagram.
Selected elements can be deleted using DEL or BACKSPACE.
To reroute/reconnect an edge, use the handles that pop up when you select it. New edges can be added by dragging the small triangles next to the nodes.
Labels can be edited with double-click.
That’s all for today. I hope I could demonstrate what is possible with the combination of these frameworks, and that the repo guides you to set up your own DSL tools.
For questions, there are forums for Xtext, Theia, Sprotty, and ELK, or just ask us directly.
This example has also been presented at EclipseCon Europe 2020 (recording, slides).
 Dr. Jan Köhnlein